In this part we will define two matrices that allow us to identify which requirements the design of the prototype must meet.
I. Movement and ventilation requirements:
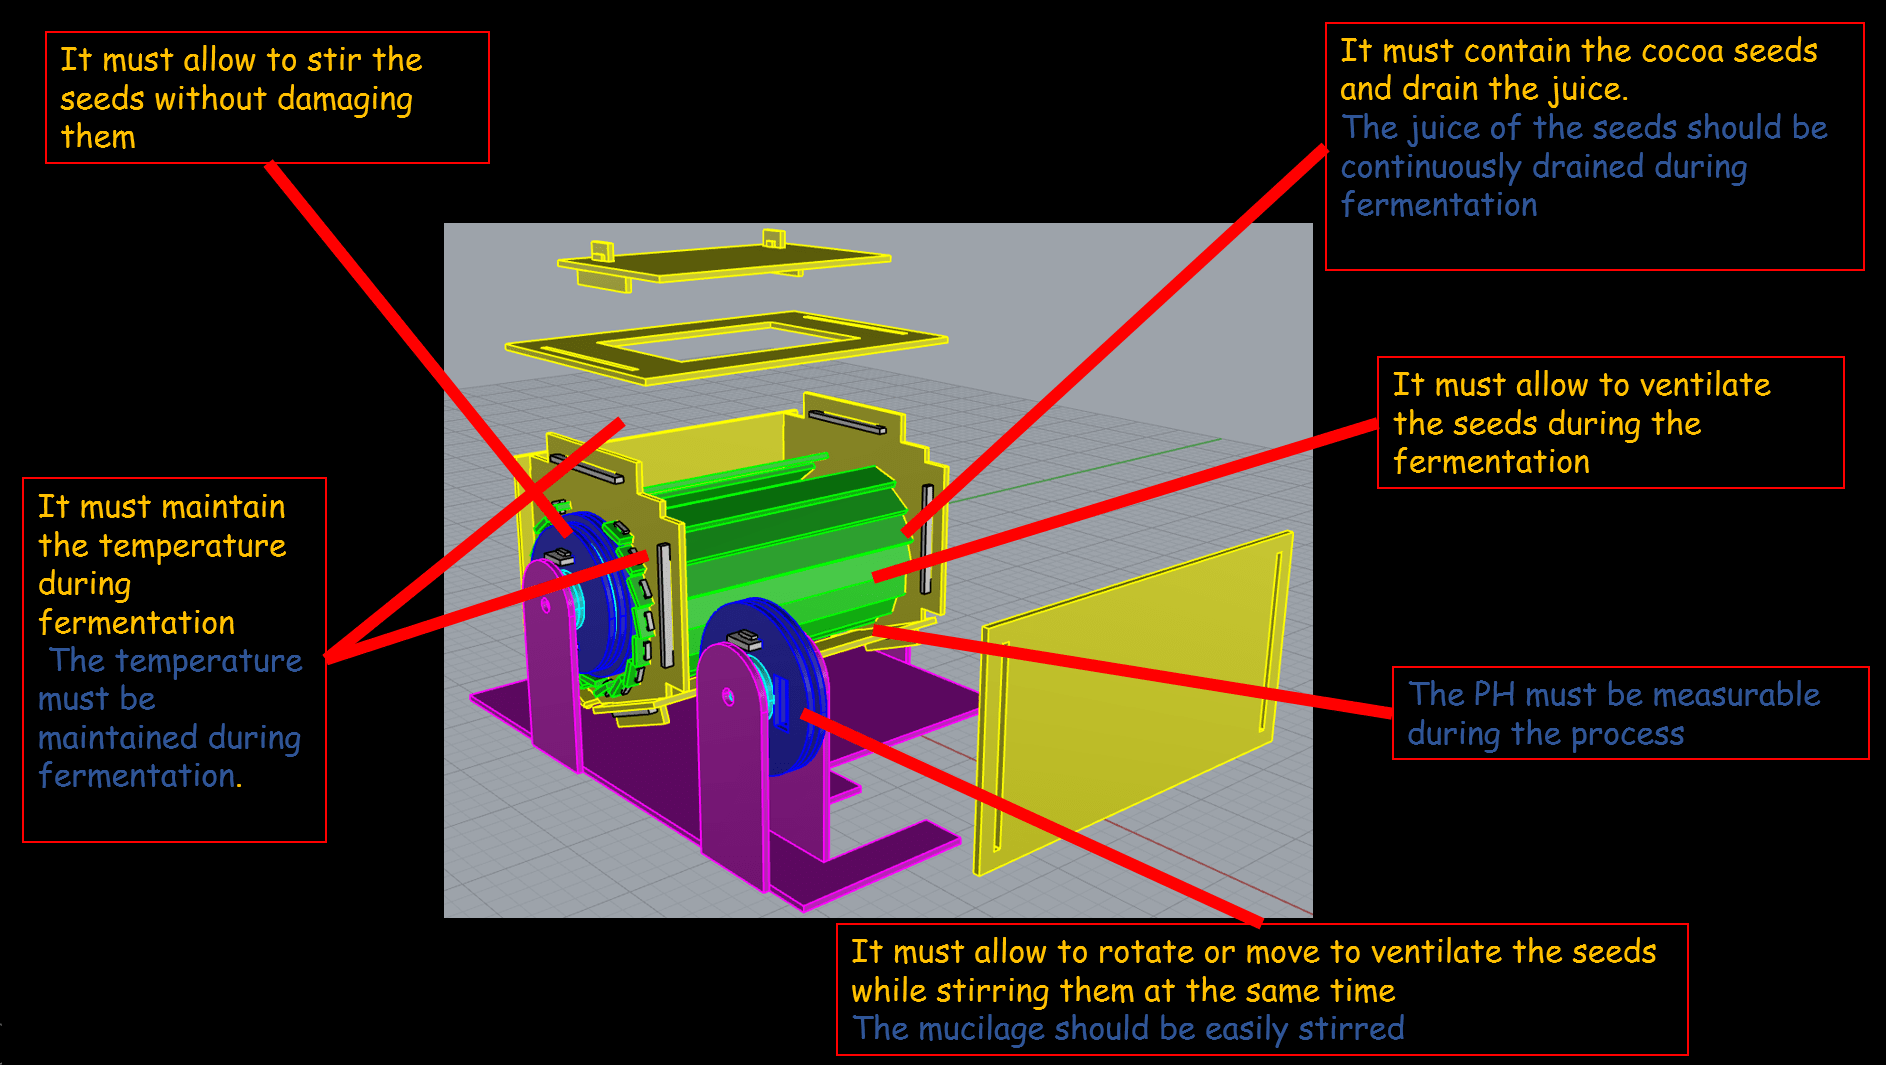
| Requirements | Alternative 1 | Alternative 2 |
| It must contain the cocoa seeds and drain the juice. | Through slits | Through holes |
| It must allow to stir the seeds without damaging them | Manually | Through Mechanisms |
| It must allow to ventilate the seeds during the fermentation | Through slots and holes fixed |
Through slits and holes movables |
| It must maintain the temperature during fermentation | Closed container | Container with openings |
| It must allow to rotate or move to ventilate the seeds while stirring them at the same time | Rotate the container | Flip the container |
II. Requirements of the fermentation process:
| Requirements | Alternative 1 | Alternative 2 |
| The temperature must be maintained during fermentation. | Closed container | Through heater and fan |
| The juice of the seeds should be continuously drained during fermentation | By gravity | Through Mechanisms |
| The mucilage should be easily stirred | Manually | Through mechanisms |
| The PH must be measurable during the process | Manually | Automatically |
Two alternatives were defined for each requirement, of which the green ones were selected considering the mechanical simplicity and the lower use of materials.
Using the selected alternatives, the Rhinoceros design was carried out to meet the requirements set forth. The following graph shows the scope of the design based on the requirements.
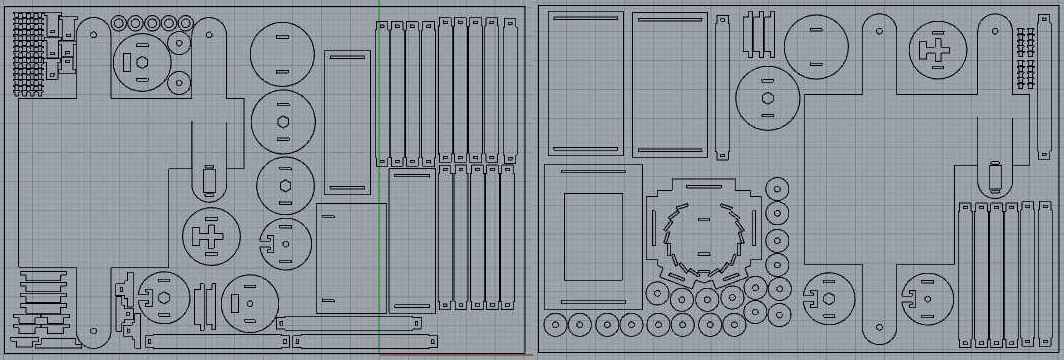
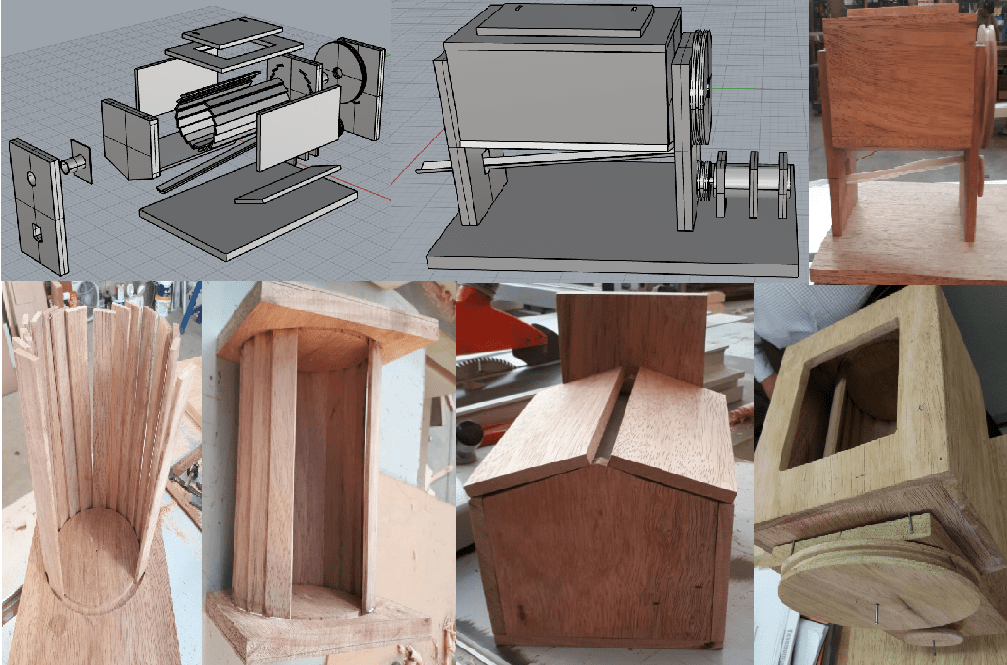
Implementation of the model:
For the implementation of the model we will use acrylic of 4 millimeters and we will scale the panels to be able to cut the parts using a laser printer.
The plans for the cut are shown below.
 |
 |
 |
 |
 |
 |
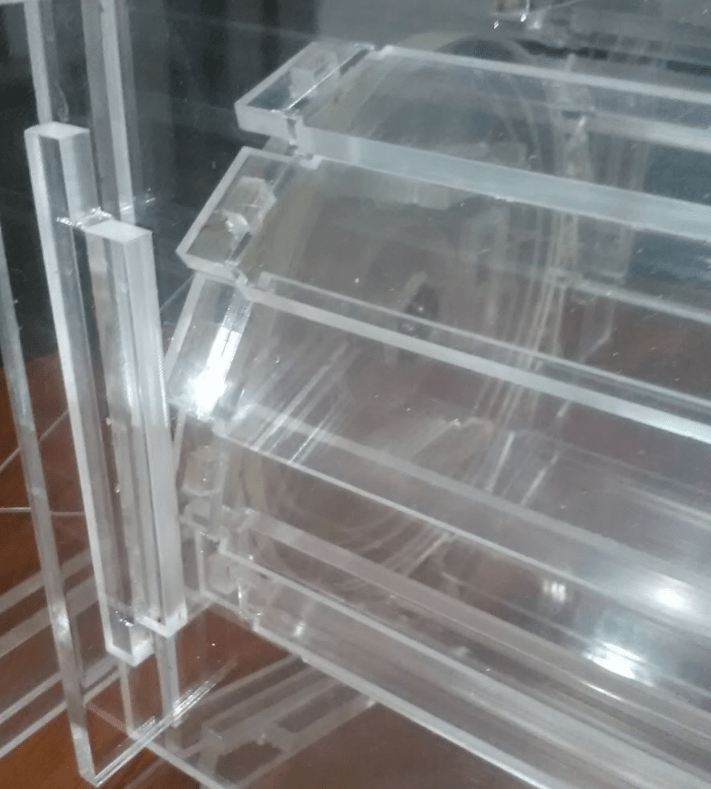
Selection of the material for the prototype:
For the determination of the material to be used in the construction of the prototype, three materials, acrylic sheets, glass and wood were considered.
In the selection it was taken into account that the effect is not known the product with the first alternative, the acrylic sheets, so it is discarded; With respect to glass, the disadvantage was the difficulty of its use in the prototype elaboration, leaving wood as the most suitable alternative.
However, the wood must have the qualities of being resistant to moisture and not leave any aroma or taste when it is moistened. From the local alternatives, the screw type wood was chosen because it meets the two requirements.
Below are some modifications made to the original design to be able to adapt it to wood work and the construction process.
DESIGN OF THE ELECTRONIC STAGE:
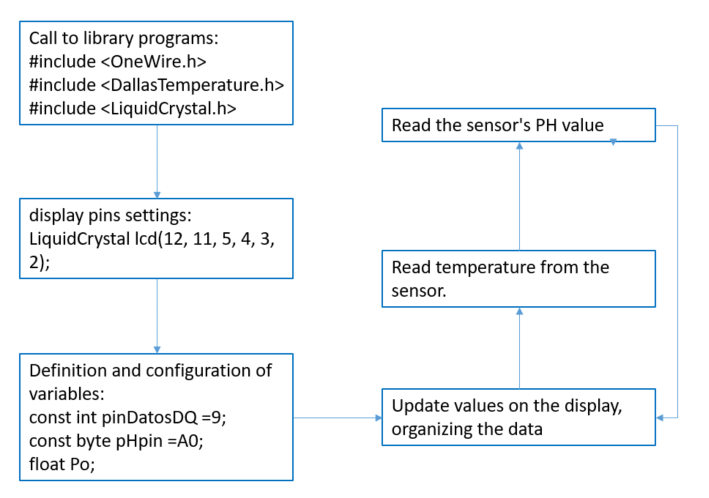
The electronic stage is composed of sensors, controller and actuator, this is shown in figure 15 in which the connection diagram that is used is given; a graphic presenter or display has been included that allows us to see the values of the temperature parameters, PH as well as the three operating states of the equipment.
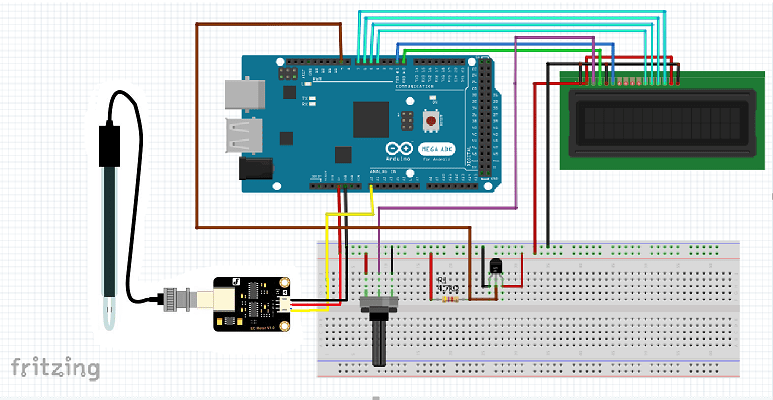
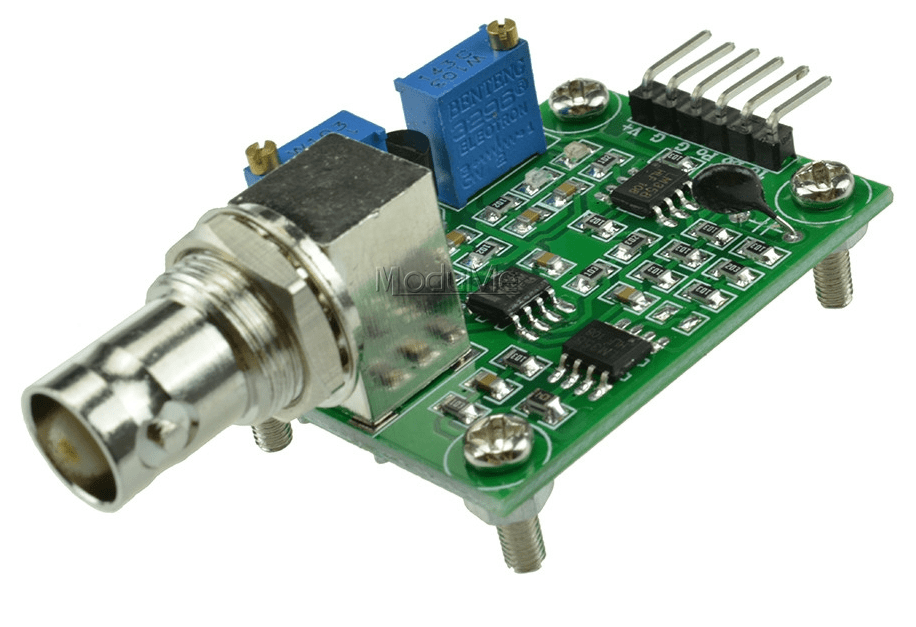
The two types of sensors that we will use are the temperature sensor DS18B20 and the Liquid PH 0-14 Value Detection Regulator Sensor Module Monitoring Control Meter Tester + BNC PH Electrode Probe. The following image shows both sensors.
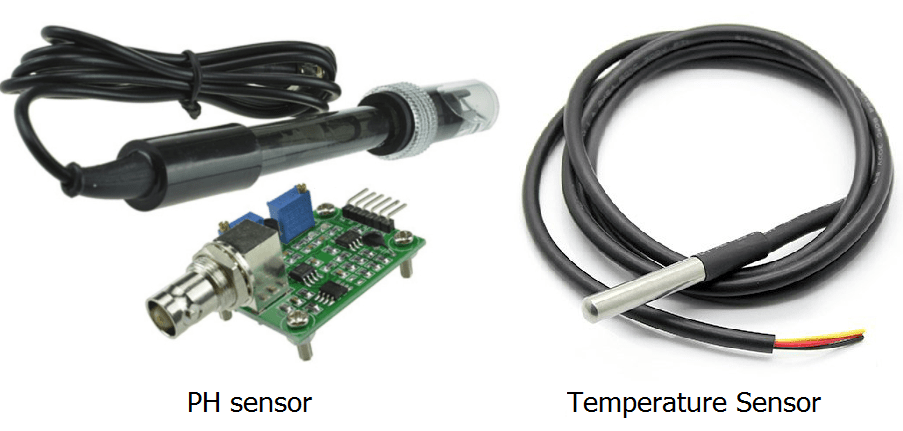
The temperature sensor is an electronic device that work as thermometer it has high accuracy over a wide range (accurate to approximately 0.5 degrees Celsius over the range of -10 degrees Celsius to +85 degrees Celsius) that mean that range of work is since -55 degrees Celsius to +125 degrees Celsius). The way to connect must be a pullup resistor of about 5K in all cases.
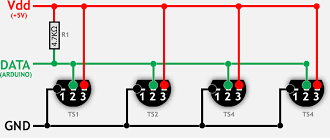
We can use also several sensor and recollect information of all of them, in our case I will use two.
In the follow figure I show the way used to connect more than two.
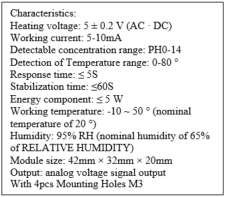
For the PH sensor, the characteristics are show in the table below, the most important for us are the range of detection from 0 to 14.
The pH is a measure of acidity or alkalinity of a solution, the pH scale varies from 0 to 14. The pH indicates the concentration of hydrogen ions [H] + present in certain solutions. It can be precisely quantified by a sensor that measures the potential difference between two electrodes: a reference electrode (silver / silver chloride) and a glass electrode that is sensitive to the hydrogen ion.
After use the sensor, it need to be calibrated follow the next procedure:
a. As we can see, there are two potentiometers in the circuit. The one that is closest to the BNC connector of the probe is the one that regulates the offset, the other is the one of the pH limit.
b. Offset: the average range of the probe oscillates between negative and positive values. The 0 represents a pH of 7.0. To be able to use it with Arduino this circuit adds an offset value to the value measured by the probe, in this way the ADC will only have to take samples of positive voltage values. Therefore we will force a pH of 7.0 by disconnecting the probe from the circuit and shorting the internal part of the BNC connector with the outside. With a multimeter we measure the Po pin value and adjust the potentiometer to be 2.5V.
c. PH limit: This potentiometer is to establish a limit value of the pH sensor circuit that causes the red LED to light and the pin signal Do to turn ON.
For the implementation of the program I use and Arduino Mega, in which we load the sensor parameter measurement program.
The structure of the program are show in the figure below.
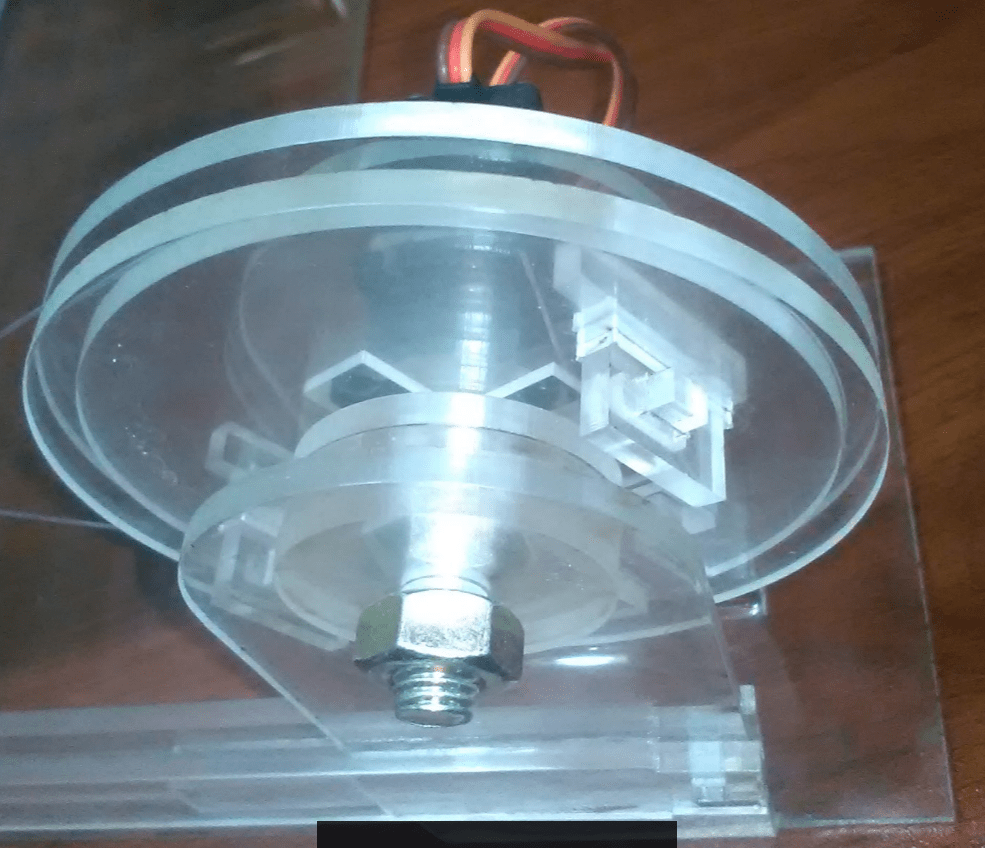
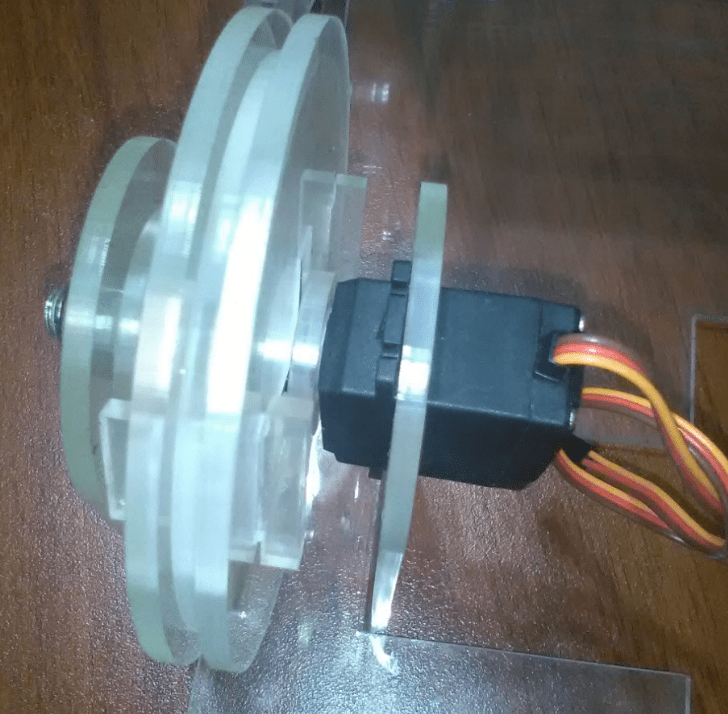
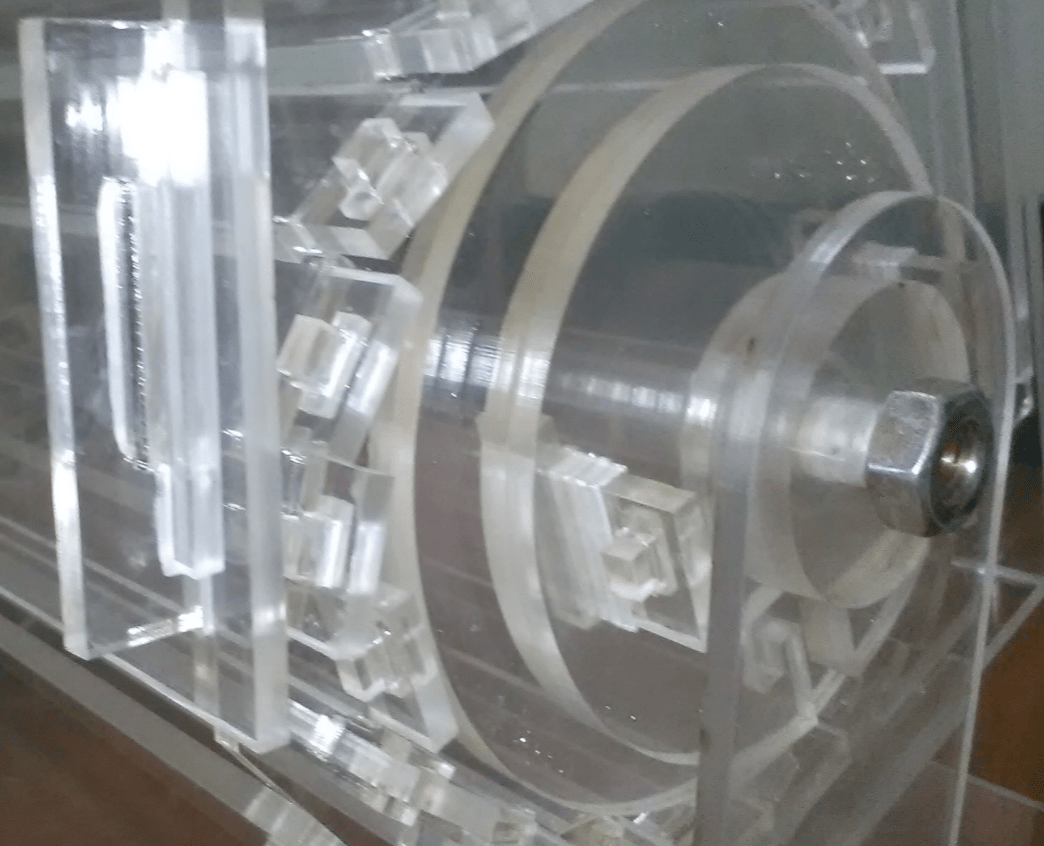
DESIGN OF DRIVE AND MOTOR:
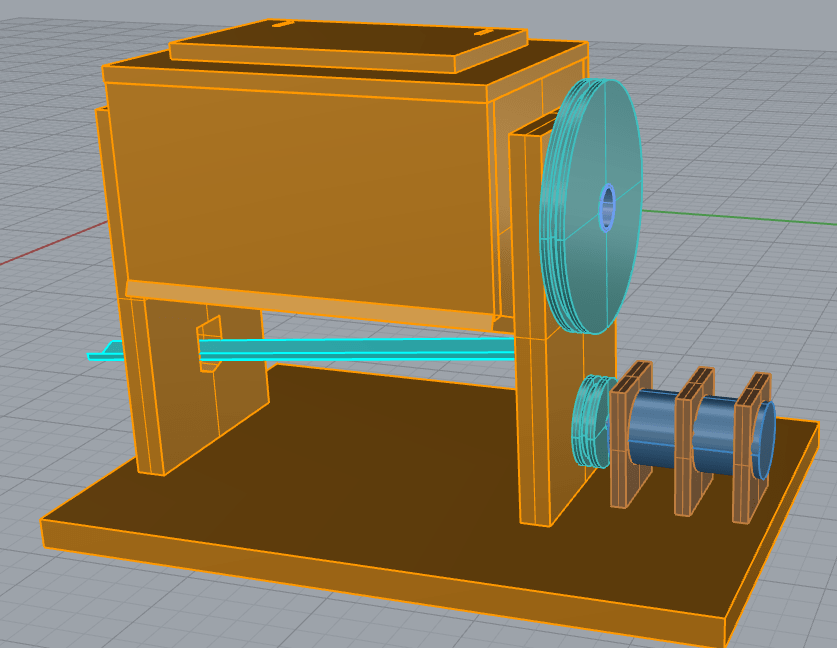
For the design of the motor and its controller we need to modify the basic structure proposed in the first part, this is observed in the improved model in which the mechanics of the motor coupling has been simplified.
However, in order to estimate the characteristics of the motor it is necessary to be able to estimate first the minimum torque that must be achieved to move the fermenter with the product inside.
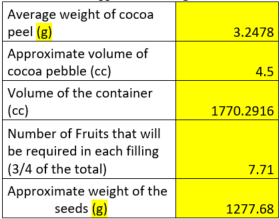
To estimate the level of torque required in the engine, we started measuring and determining the approximate weight and volume of a cocoa bean, then the approximate volume of the container is determined and it is considered not to fill it with seeds since these must be removed in the process that is why I will be taken only the middle of the total volume. Based on this, the amount of approximate seeds that will be used and their approximate value is determined, this data is recorded in the table shown.
The force required to move the container as shown in the figure by means of a dynamometer was measured and an approximate value of 200g was found.
Therefore, with these data, we can estimate the force that we will require in the smaller diameter pulley and the amount of torque in the motor.

Considering the distribution of forces in the figure and using the principles of physics, first and second law of Newton, are obtained for the minimum force necessary to break the inertia of the fermenter is:
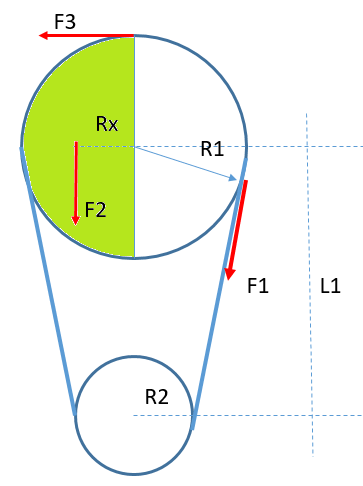
In the diagram shown R1 is 7.5cm, R2 is 2.5cm, L1 is 14cm, Rx is the radius to the center of gravity (4.R/3.pi) equal to 3.18cm; F1 represents the transmission force to the motor pulley, F2 is the opposing force in the worst case when the seeds are at 90 degrees of perpendicularity considering the location of this force in the center of gravity of the half of the cylinder. F3, is the minimum force to break the inertia of the container previously measured.
Using the equation:
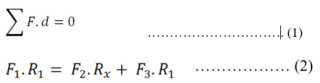
Applying equations 1 and 2 and with the aforementioned data we obtain the force F1 equal to 741.73 grams force; applying to the motor the torque required for radius R2 results in 1854.34 grams of force, moving to units of newton we have 1818.48mNm.
The used motor has the following characteristics: DC24V, 1.18Nm, 30 +/- 4 rpm.
FINAL IMPLEMENTATION OF THE EQUIPMENT:
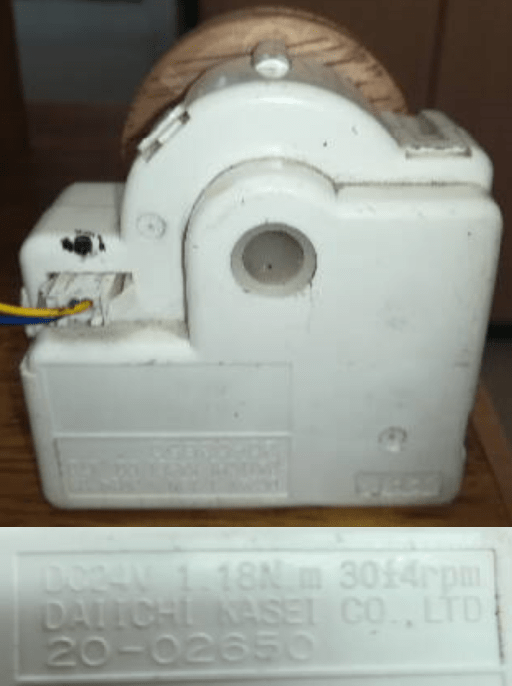
To carry out the final assembly of the equipment, individual tests of the mechanical part, the sensors, and the electronic part were related. After which the assembly was carried out, the user interface has a display showing the temperature of the interior and the fermentation chamber, the reading of the PH resulting from the juice that filters from the seeds during the process and a keypad that allows it to live at two different speeds.
The following figure shows the assembled equipment.

The control functions of the opener panel are: (ON / OFF) On and off, (MODE1) Turn alternated at low speed, (MODE2) continuous rotation, (MODE3) turn alternated at high speed, (MODE4) stop rotation, T ° 1 interior temperature, T ° 2 outside temperature, PH PH value and MODE indicator of working mode. This is shown in the following figure.
FIELD TESTS AND RESULT:
The quality of cocoa for the production of chocolate is based on the genetics of the plant planted, but the power to obtain a quality product is due to two processes, the first is the seeding and the second the fermentation process. During fermentation, two stages are generated, the first in which the lactic acid bacteria (LAB) develop and the second in which the acetic acid bacteria (AAB) develop.
It is known that almost half of the cocoa worldwide is fermented in wooden boxes of various sizes. And another half through more traditional methods.
Day 1: The temperature inside the fermenter should vary between 26 to 28 ° C in the day and between 20 to 24 ° C in the night. The PH remains constant at approximately -6.00. A smooth and constant movement is made.
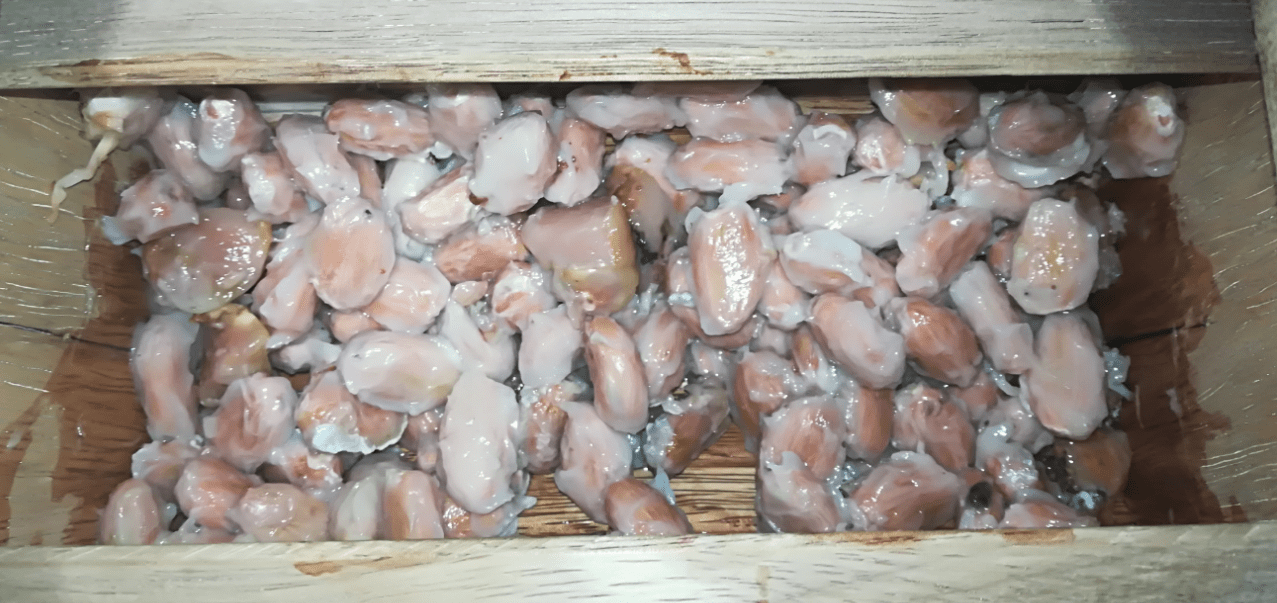
Day 4 and 5: The temperature stays between approximately 35 to 40 ° C. Again a smooth movement is made and the PH decreases to 3.75.
Day 6: The temperature stays between approximately 25 to 28 ° C. Again a smooth movement is made and the PH decreases to 3.75. A stronger movement begins.
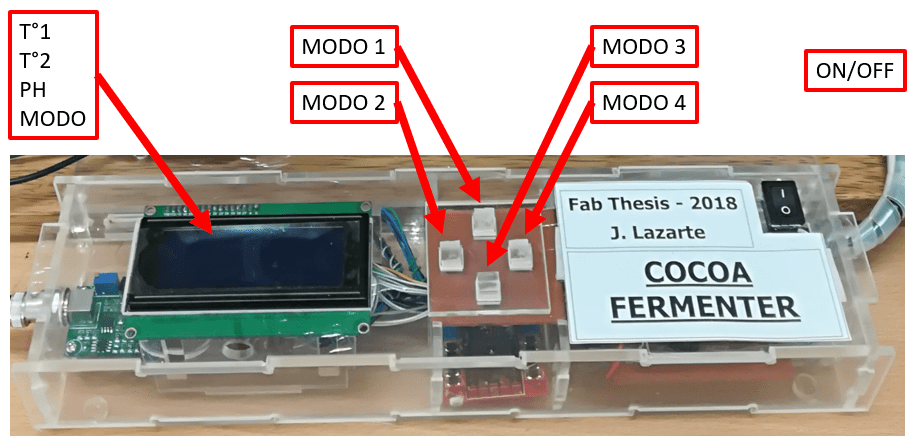
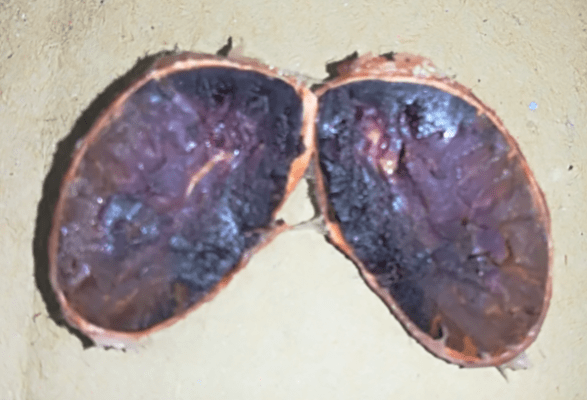
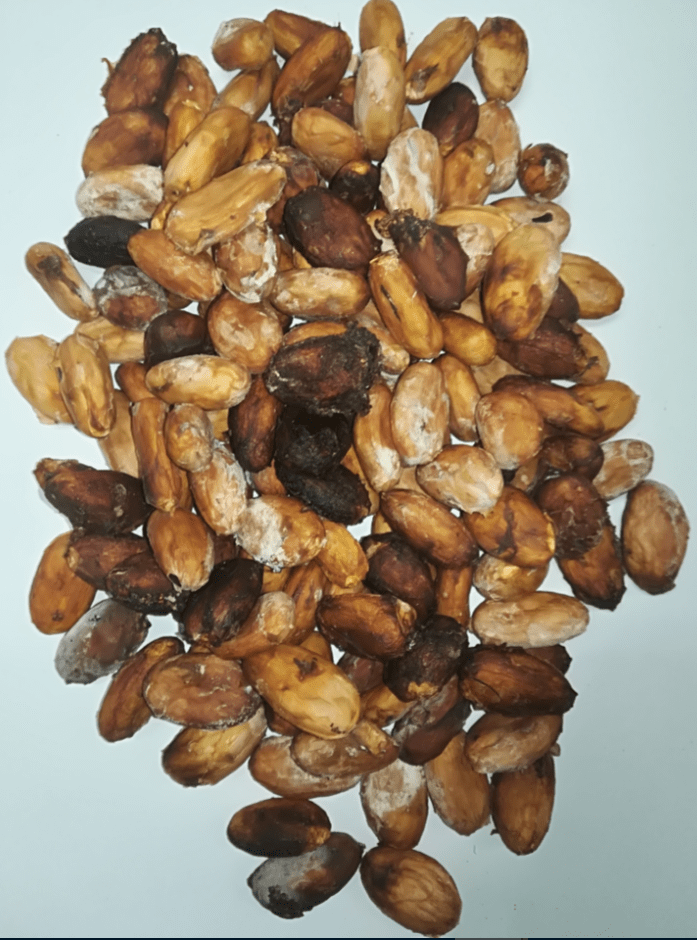
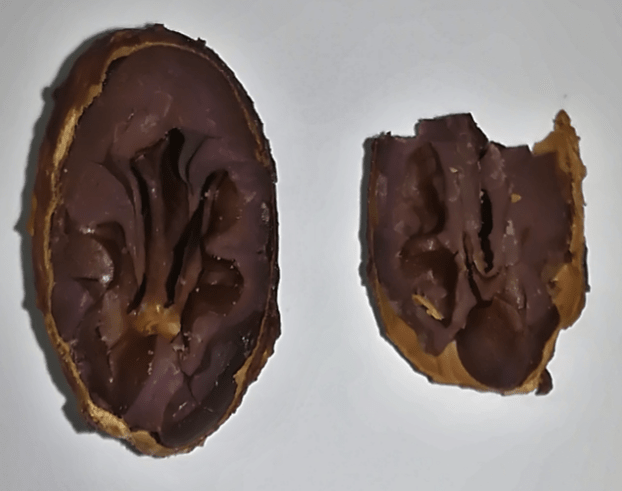
After six days of fermentation, drying was carried out in an environment whose temperature was between 35 ° C and 42 ° C, which allowed a uniform drying, obtaining the final product shown.
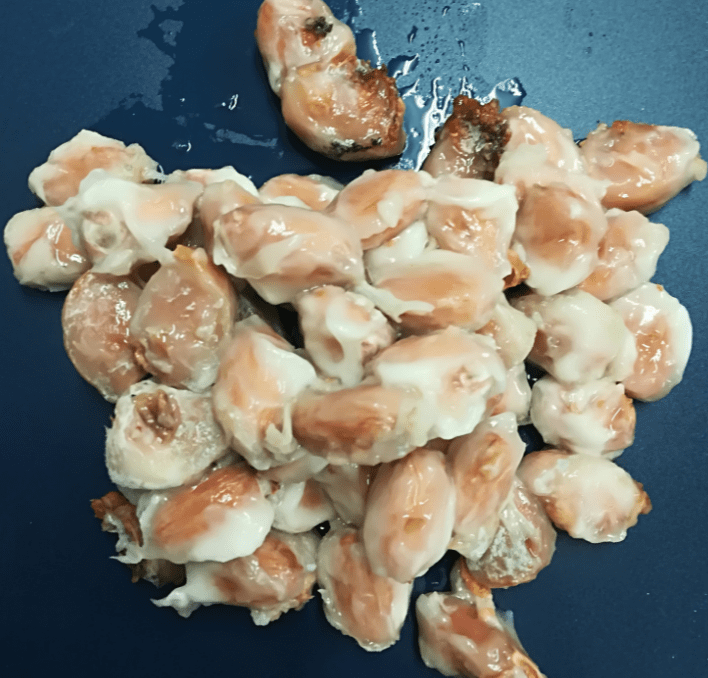
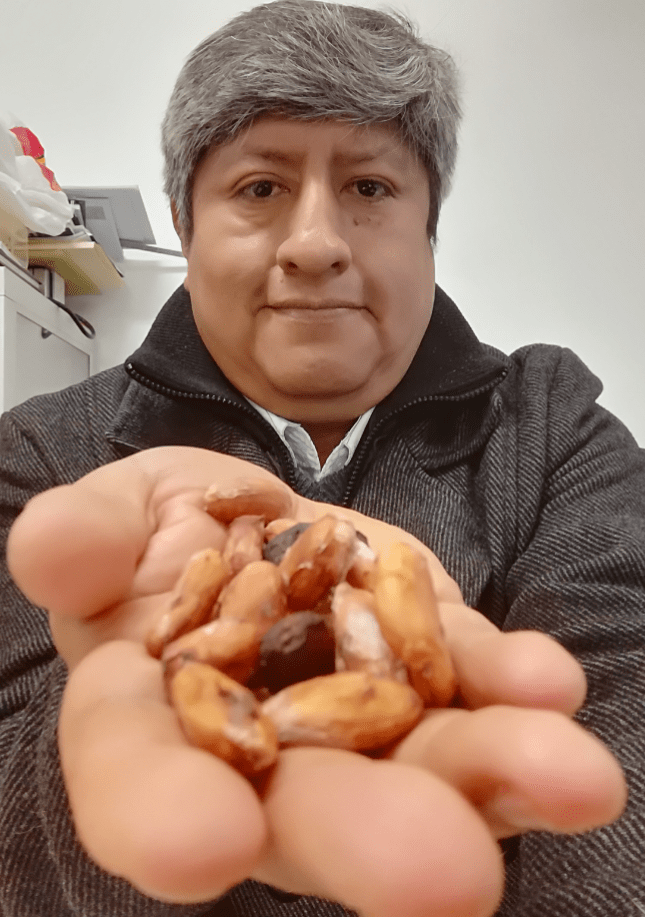
For the proofs of the fermenter, the cacao of the Creole type was used, and an approximate weight of 410 grams.
- The purification process worked and an abundant juice runoff was obtained, which allowed us to easily measure the pH, which in a high value of -6 approximately.
- As the temperature increased, the amount of juice was reduced and became thicker with a denser consistency, and the pH was reduced to approximately 3.37.
- It is confirmed that the balancing movement allows a correct airing, with which the mechanism is suitable for the
- The final result has a very strong aroma and an attractive color as shown in the image, which allows to conclude that the equipment is adequate to carry out the fermentation process successfully.
REFERENCES
[1] Institut africain pour le développement économique et social (INADES). (1970). cocoa. 10/04/2018, de FAO Sitio web: http://www.fao.org/docrep/006/ad220e/AD220E00.htm#TOC
[2] Adeyeye, E. I., R. O. Akinyeye, I. Ogunlade, O. Olaofe, and J. O. Boluwade. 2010. Effect of farm and industrial processing on the amino acid profile of cocoa beans. Food Chem. 118:357–363.
[3] Bentley, J. W., E. Boa, and J. Stonehouse. 2004. Neighbor trees: shade, intercropping, and cacao in Ecuador. Hum. Ecol. 32:241–270.
[4] Kostinek, M., et al. 2008. Diversity of predominant lactic acid bacteria associated with cocoa fermentation in Nigeria. Curr. Microbiol. 56:306–314.
[5] Lefeber, T., W. Gobert, G. Vrancken, N. Camu, and L. De Vuyst. 2011. Dynamics and species diversity of communities of lactic acid bacteria and acetic acid bacteria during spontaneous cocoa bean fermentations in vessels. Food Microbiol. 28:457–464.
[6] INTA. (2009). El Cacao. Nicaragua: Gobierno de Nicaragua. Año 2, Numero 12.
[7] INTA. (2009). El Cacao. Nicaragua: Gobierno de Nicaragua. Año 2, Numero 4.
[8] Aroldo Dubón. (2016). 10 CONSEJOS PARA LOGRAR CACAO DE CALIDAD. La Lima, Cortés, Honduras, C.A.: Centro de Comunicación Agrícola de la FHIA.
[9] Julio Guevara. (2018). A Step-by-Step Explanation of Cacao Harvesting & Processing. 1/04/2018, de Perfect Daily Grind Sitio web: https://www.perfectdailygrind.com/2018/02/step-step-explanation-cacao-harves
ting-processing/
..